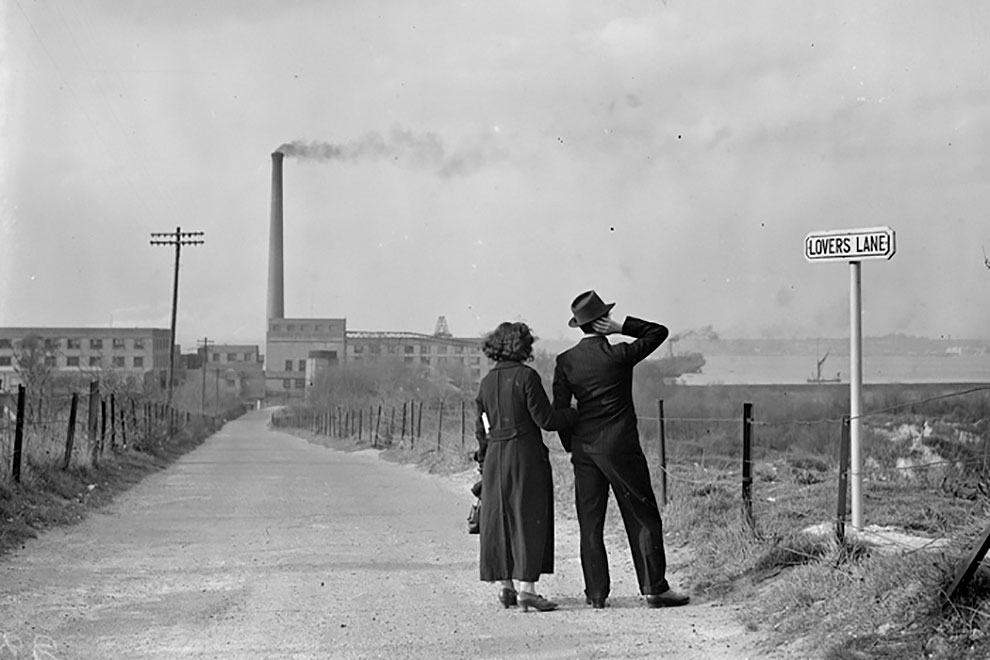
“My life is shaped by the urgent need to wander and observe, and my camera is my passport -Steve McCurry. “
As you probably know by now, after receiving a gazillion emails advising you of the fact, last month saw the introduction of the GDRP, the EU’s General Data Protection Regulation. And in an article on his website, German photographer and journalist, Hendrik Wieduwilt, is worried. Very worried.
We’ve all heard the saying that a camera adds ten pounds, and to an extent that’s true. Choosing the right lens for your portrait photography really depends on the effect you want to give. The same portrait of a person shot with different lenses shows how much a lens, and the distance you are from the subject, affects the way the person looks in the photograph.
Your camera requires a service at least once a year, depending on how you use it. By taking it to an authorised service centre, you are prolonging the life of your travel companion, as the technician will make sure that everything is working well, that your sensor is clean, and that your camera firmware is up to date.
A photo editor once told me that the difference between a good photo and great photo can be measured in a fraction of a second. Having hopefully mastered your ISO and aperture settings in these past few months, we can now focus on what is for most, the most fun setting in photography; The shutter speed.
Getting to grips with Aperture
For most of us, taking that first step in switching to the dreaded Manual Mode on your camera can seem ludicrous. Why on earth should I switch to Manual Mode, when the camera can easily take a picture for me? Why should I even leave Auto Mode, for that matter? If it’s there, why can’t I use it.
Well, you can, but may not end up with a photo you were hoping for. Once you understand that taking a photo is basically exposing light to a sensor, or film, you are halfway there. Last month we spoke about the holy trinity of photography that is the Exposure Triangle, the ISO, Shutter Speed and Aperture.
And I call it the holy trinity, because these three elements work together. They depend on each other, and we combine them in such a way so when we hit that shutter release, the amount of light hitting that sensor or film is just right to get you a “good exposure.” And I put good exposure in quotation marks, because exposure really depends on whether you are happy with the result. Confused yet?
Basically, ISO, Shutter Speed and Aperture (or f stop) do exactly the same thing. They control how much of that light hits the sensor. ISO, the film or sensor speed, does that by being either too sensitive to light, (ISO 3200), or not very sensitive (ISO 50). When shooting analogue, you won’t get very far if you don’t put a film in the camera, so you choose the right ISO for the light conditions. If it’s too bright, you use a less sensitive ISO (lower number) like 50, or 100. If it’s cloudy you use a more sensitive film (higher number) like 400, and the darker it gets the more sensitive film you will need.
This is the same with digital cameras. Before we start shooting, we check the light and set our ISO speed accordingly.
This month’s focus (no pun intended) is the aperture. Found in your lens, (not the camera) the aperture basically does the same job that the Iris in your eyes does. If it’s too bright it closes, and if it’s too dark it opens. The wider the aperture can open, the more expensive the lens usually is, so now you know why some lenses are ridiculously expensive.
Aperture is measured in F-stops like f1.2, f5.6, f11, etc. The lower the number the wider the aperture, and more light will hit the sensor, or film, so an aperture of f1.2 is extremely open, and an aperture of f32 is tiny. Think about it like this: Small number, big hole, big number, small hole.
So when we expose, we can choose to let in more or less light hit our sensor or film by opening and closing the aperture, just like a tap of water filling up a bucket. The more you open the tap, the more water runs out, and vice versa.
Now, you are probably wondering what setting to use when you expose. If ISO, aperture, and shutter speed all do the same thing I.e. controlling the light that hits our sensor or film, what do we prioritise on? When do we use aperture? When do we use shutter speed?
Well, we will be talking about shutter speed in the next article, but when it comes to aperture, apart from controlling the amount of light that hits the sensor, it also does something else that is quite magical: It controls how much of the area behind and in front of your subject is in focus. You might have noticed that landscape shots are always sharp, showing the entire scene in focus, while the background in portrait shots is usually blurry in an effort to isolate the subject you are photographing from anything distracting in the background.
This control of the sharpness of the foreground and background is called depth of field, and the aperture is the tool with which we control that depth of field. The wider the aperture (low number, bigger hole, like f1.2) the blurrier the background will be, and the smaller the aperture (high number, small hole, f32) the sharper the background will be.
In other words, if you are shooting landscapes, you would be better off setting a smaller aperture, like f16 or f22, in order to make sure that the entire scene you are capturing is sharp, whereas if you are shooting portraits, you should really set a wider aperture like f2.8, f3.5 or f4 to try and blur the background and lead the viewer’s eye straight to your subject.
One thing to remember, however, is that zooming in and out with your lens, as well as the physical distance between you and your subject, also affects how blurry or sharp your background will be. The closer you are physically and by zooming in with your lens, the blurrier the background will be, and the further away you are physically and by zooming out, the sharper the background will be.
A great way to see how apertures work is to click on this link to see how the aperture works on this canon exposure simulator, and to get to grips with exposure check out our Digital Photography workshops. Have fun!
For the uninitiated, auto mode on the camera would seem like a blessing. Point the damn thing where you want to take the photo and the camera does everything for you. Except it doesn’t. As expensive as it may be, as professional as it may be advertised, and despite leaps and jump in technological advances, modern digital cameras are still, well, stupid.
In fact, the term “point and shoot” should really be banned, or renamed to “point, shoot and hope for the best,” because really that is what we are doing. You stick it on Auto mode, you take a shot of this wonderful moment and view the image only to discover the camera didn’t focus where you wanted it to. Or the photo is all shaky, or noisy (grainy), or entirely out of focus.
Derek Lomas is living proof that it’s never too late to start photography as a career. The LSP Product Photography trainer worked for four years as a shipping clerk after leaving school, and he hated every minute of it.
So he joined an evening photography course and he hasn’t look back since. With clients like L’Oréal and Yves Saint Laurent, Derek is now an established photographer with an incredible portfolio, and was eager to share some of his experiences, and offer some tips to our students.
“It’s one thing to make a picture of what a person looks like, it’s another thing to make a portrait of who they are.” Paul Caponigro
Those of us born before the new millennium most probably would have handled some sort of film camera one way or another, and whether that was a 35mm or a 120mm, thinking about dad’s camera brings back many warm memories. I still have my dad’s camera, a 1965 Nikon F and apart from the broken light meter – a common problem with the first series of this legendary camera – it still works like it just came out of the factory